SMS
Individual SMS messages can be sent to the patient from the Patient Screen and messages to groups of patients are sent through the scheduler.
How to send an SMS to just one patient.
Sending SMS from the Scheduler
To open the scheduler go to the main menu and select Patient, Scheduler.
The scheduler is designed to send SMS to patients before they have come to the practice. Any patient with the status I – In Waiting Room or already billed will not automatically be selected to send a message.
The scheduler opens on the current date. If you want to send messages for a date in the future just select the date in the calender at the bottom of the screen. For more information refer to Select Scheduler Date.
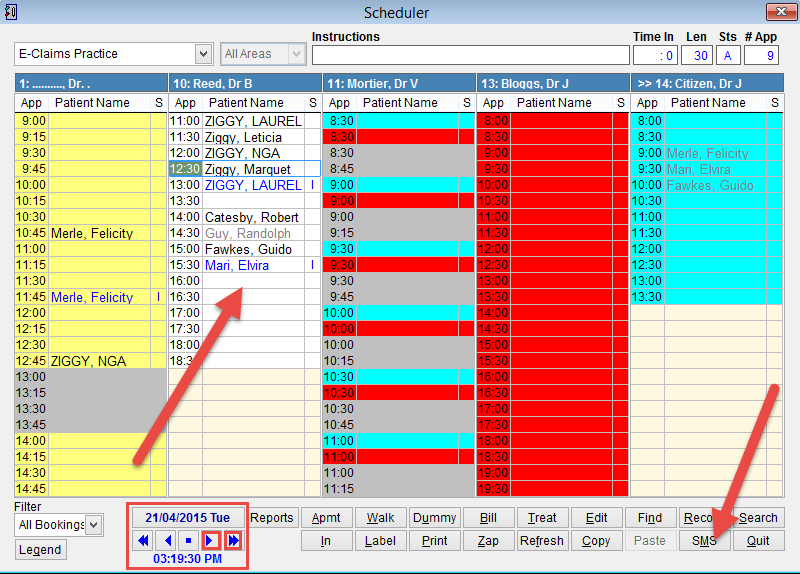
eClaims will send a message to an individual patient or to all patients for a selected doctor.
Click on the Doctor or Room in the scheduler and then click SMS at the bottom of the screen to open the SMS screen.
The SMS screen will appear on the tab Compose to send bulk messages to patients.
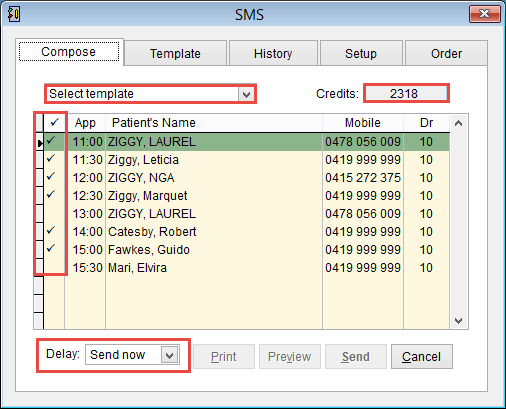
To send a message to clients with a status I just double click on the name so that a tick is added in the first column. Made an error, double click on the name again to remove the tick.
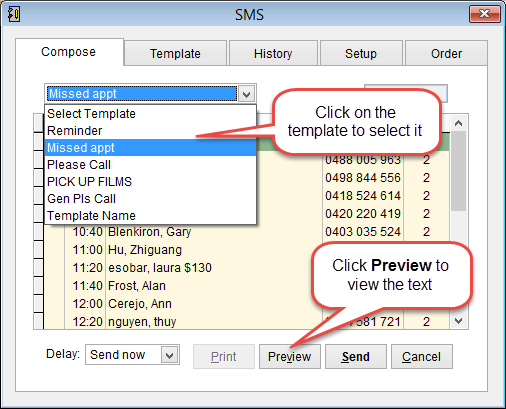
Click Select Template to open a menu of available template. Chose the message that will be sent to the patient and the buttons Preview and Send will become active. Click Preview at the bottom of the screen to see the SMS that will be sent to the selected patients. Click Send to send the messages to the selected patients or Cancel to discard changes and return to the previous screen.
Click here for How to Create an SMS template.
Credits in the top right corner of the screen displays the amount of messages that are available. It can take a few days to process payment for additional credits so please remember to order credits in advance. For more information refer to buying SMS credits.
Below you see a list of patients with a mobile phone number. The first column marked with a tick
![]() indicates that a message should be sent to the patient. By default any patient with the status I (In waiting room) is not selected
indicates that a message should be sent to the patient. By default any patient with the status I (In waiting room) is not selected
Double click in the first column to select/de-select the patients.
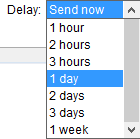
Delay sets when the message will be sent. Click on the drop down arrow and select when the message will be sent to the patient.
Click Preview at the bottom of the screen to see the exact message that will be sent to the patient. The message that will be sent to the patient is displayed.
Length is the number of characters in the message. If this number turns red it means you have reached the maximum SMS size that can be sent. Any text that exceeds the maximum number will not be sent to the patient.
# of SMS the total number of SMS messages that will be sent to this patient. If there are more than 160 characters eClaims will send an additional SMS to the patient if this feature is enabled.
Credits Left is the total number of available messages available.
Patients Name is the family name, first name of the patient.
If messages are personalised the total number of characters will vary for each message. SMS messages are limited to 160 characters per message. If the SMS exceeds 160 characters then the text will be separated into two SMS messages sent to the patient and deducted from the available credit. To allow patients to respond to SMS messages or modify the number of messages sent to the patient refer to SMS Setup
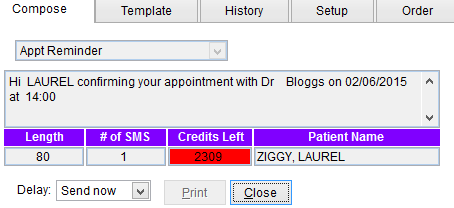
Click Close to return to the previous screen.
Messages can be personalised using the patient name, doctor name and time of appointment. SMS is a great way to send a reminder of a patient appointment or notify patients quickly if the doctor is unavailable or delayed.
Click Send to send the SMS to the selected patients or Cancel to close the screen and discard and changes.
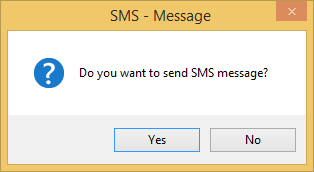
Click Yes to confirm sending the SMS messages.
A confirmation screen will be displayed to confirm the message has been uploaded to the SMS server. Click OK to close this screen.

Did you know that patients can also send responses to SMS messages. To activate replies click here. SMS Setup.
Template
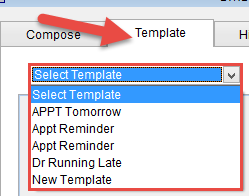
Click on the Template tab at the top of the screen to view, add or delete a template.
Click on the drop down arrow to see a list of saved templates. Select a Template for it to be displayed on the screen.
When a template is selected it will be displayed on the screen and can be modified. Click Save to keep changes or Cancel to discard changes and return to the previous screen.
Click Dele at the bottom of the screen to delete the selected Template from eClaims.
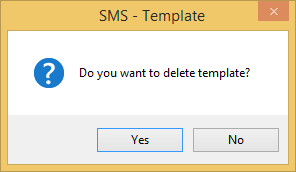
Click Yes to confirm delete or No to discard changes and return to the Template screen.
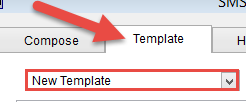
To create a new template have Select Template in the menu and click New at the bottom of the screen.
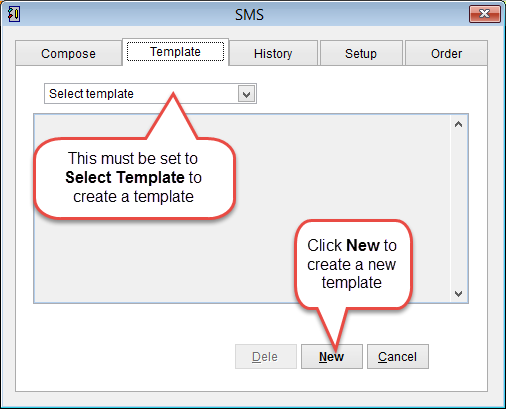
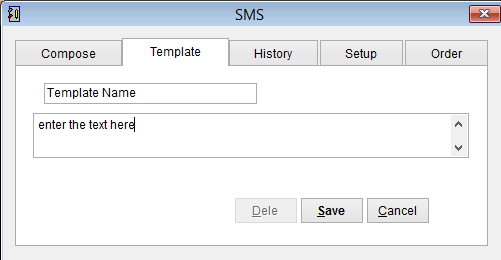
Add the Template Name and then the text below. Click Save to add the template to eClaims or Cancel to discard changes and return to the previous screen.
To check if the template has been added correctly click on the Compose tab at the top of the screen and click on the name in the available templates
History
Click on the History tab to see a record of sent messages.
By default the system will display messages sent in the last month. Want to see a different date range, just click and change the dates under From / To.
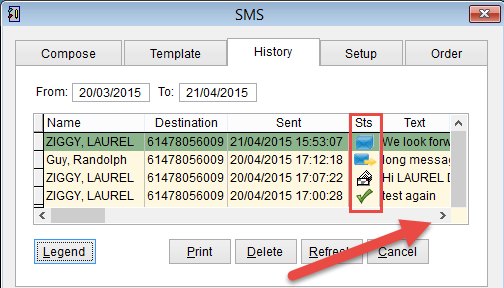
You can see the patient name, destination mobile number, date and time that the message was Sent, Sts (status), message text, the eClaims UserId that sent the message and replies from the patient if SMS Reply is set as active in eClaims.
Want to see the message that was sent to the patient. Click on the arrow at the bottom of the screen to scroll left / right or up / down.
Click on Legend to see all of the symbols displayed under Sts (Status).
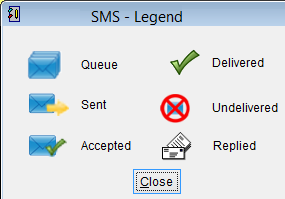
SMS Legend
| Queue | SMS is queued and waiting to be sent |
| Sent | Message has been sent from your computer |
| Accepted | Message has been received by the SMS server |
| Delivered | Message has been delivered to the patient |
| Undelivered | Unable to deliver the message |
| Replied | Patient has sent a reply to the message |
Print opens the SMS History Report screen.
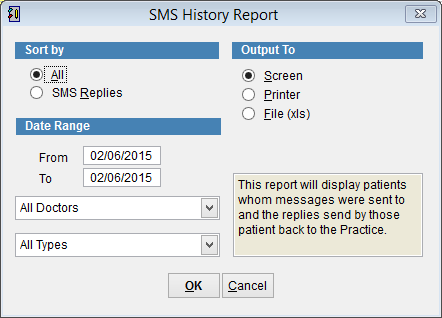
For more information refer to SMS History Report.
Delete removes a message. It is only possible to delete messages when they are queued. Once the message has been sent it is not possible to delete the message. If no messages are queued this button will be greyed out.
Refresh will refresh the screen and update any changes in the message status field.
Cancel closes the screen and returns to the previous screen.
Setup
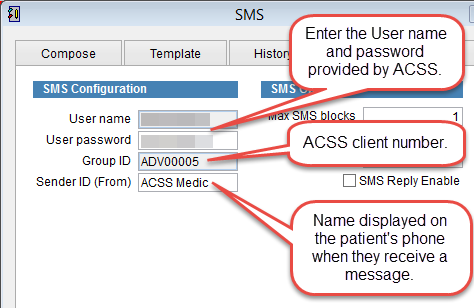
The Setup screen displays the account information and SMS options.
SMS Configuration displays the account information.
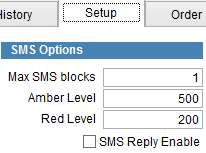
SMS Options
Max SMS blocks refers to the maximum number of SMS messages sent to a patient at one time. SMS messages are limited to a total of 160 characters including spaces between words. If limited to 1 message and the message exceeds 160 characters, only the first 160 characters will be sent.
Amber Level and Red Level are automatic alerts to remind you when to purchase additional credit. When the total number of available credits reaches this number the Credits field will become amber or red and a message *** Credit Level : VERY LOW *** displayed in the Compose screen. It can take several days to receive additional credits so please remember to order in advance.
SMS Reply Enable can be selected to allow patients to send responses back to messages received.
Click on Save to save changes or Cancel to discard changes and return to the previous screen.
Order
Click on the Order tab to order additional SMS credits. For more information click here Ordering SMS credits.